Now Google and its search engine are considering the site speed as a ranking factor. So I have written this post for our users to improve their site speed to an optimum level. By doing that, you will find out that your site has improved the site speed and got a huge spikes in traffic. I use W3 Total Cache plugin to improve the performance of my website. There are several people who also ask for how to install and setup WP Super cache. That is why in this post, I shall show you how to install and setup WP Super Cache with ease.
Note: Both WP Super Cache and W3 Total Cache are great plugins. I highly suggest that you use one or the other depends on your needs.
First of all, you have to install and activate WP Super Cache plugin (tutorial: how to install a WordPress plugin).
After activation, WP Super Cache will inform you that caching is not enabled on your site right now.
Setting up WP Super Cache – The Easy Way
To enable cache, go to Settings > WP Super Cache.
Under the easy tab, you need to turn cache on and press update status button.
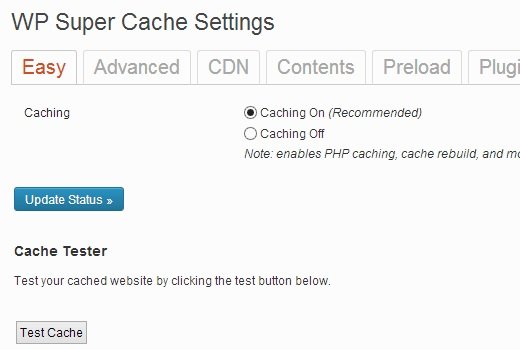
After turning on the cache, you need to click the test cache button to check whether it is working or not. WP Super Cache plugin will fetch your WordPress website twice and will compare the time stamps of both pages. If the both times tamps are matching, it means that cache is working on your website now.
WP Super Cache Advanced Set up
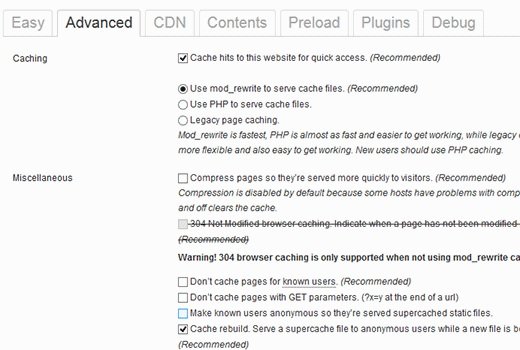
WP super cache is a powerful tool and plugin, it also has advance options. These options have the ability to improve the performance of your site. To set the advance options of WP super cache, visit Settings>WP Super Cache and click on advanced tab.
Enable Caching
first of all, check the box that says Cache hits to this website for quick access. Below you will see three more caching options. WP Super Cache uses PHP to serve cache files by default. However, it can be resources intensive on shared hosting if using PHP to serve cache files.
So I would like to suggest that you try using mod-rewrite to serve cache files. Now scroll down and press the update status button to save the settings.
WP Super Cache will show you a notification that mod_rewrite rules must be updated and another notification about scheduling garbage collection.
Scroll down the page to see mod_rewrite rules that need to be added. Click on update Mod_Rewrite rules button to update the rules.
After updating the Mod_Rewrite rules section, you will see that section has turned green.
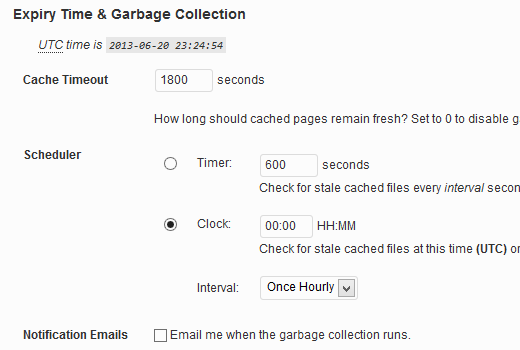
To get rid of the notification about garbage collection, scroll down on the advance settings page to the ExpiryTime & Garbage collection section and set up a frequency and time for garbage collection of cached files on your server.
Enable Compression in WP Super Cache:
Compression enables WP Super Cache plugin to serve cached files as compressed files. The files are downloaded by the user browsers quickly because they have the smaller size.
Simply check the box that says Compress page so they’re served more quickly to visitor to enable the compression.
Setting up CDN with WP Super Cache
Most content sites serve a lot of static files with each page request. These files are images, stylesheets and JavaScripts etc. unlike your WordPress posts which are generated by PHP, these files can be served by a CDN or Content Delivery Network. If you do not have any idea what is a CDN and why you need a CDN, then you should read our post about What is CDN and why do you need one.
If you need a tutorial on how to install and setup MaxCDN for WordPress then we have one.
The tutorial uses W3 Total Cache but the basic concept is the same.
To setup CDN using WP Super Cache, you need to click on the CDN tab and check the box next to Enable CDN support option.
Enter the offsite URL that will be the URL of your pullzone, for example, https://cdn.greenhatexpert.com
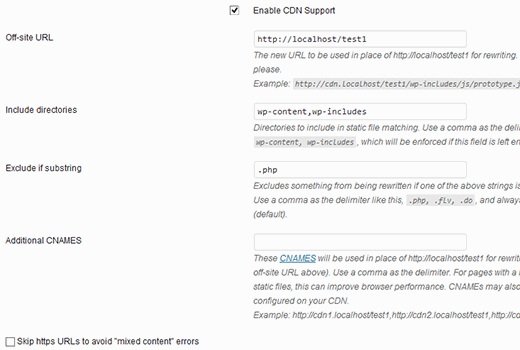
In the additional CNAMEs field, enter other CNAMEs that you created for pullzone.
For example, https://cdn1.greenhatexpert.com, https://cdn2.greenhatexpert.com, https://cdn3.greenhatexpert.com.
Lastly, check the box that says Skip https URLs to avoid ‘mixed content’ errors and save the changes. Now your site is ready to serve static content using a CDN.
Serve a Static Site with WP Super Cache
WP Super Cache has a preload mode to create super cache static files for all your pages and posts and serve a static site. You may ask why would anyone want to do that?
To conserve server resources.
To serve an old site that is not being updated anymore.
To improve the speed of site by serving static content only.
These are the few reasons but there can be several reasons and situations where you may want to entirely disable PHP processes.
Do not worry your WordPress will work in a normal way, you can still be able to manage your content on WordPress.
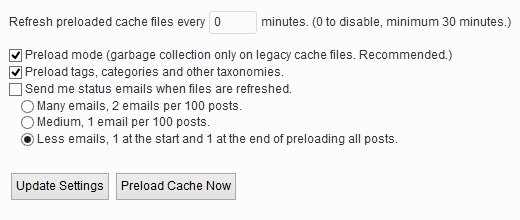
Refresh preload cache files options will be set to zero by default, minimum required time is at least thirty minutes. Pre-loading your full WordPress website takes some time and consumes a lot of resources on your server. You can leave it to zero (0) if you do not want your static files to expire ever until you manually refresh cache.
I hope that this post will help you to setup WP Super Cache on your WordPress blog.
For other feedback and questions, please leave it in the comment section.
Do not forget to share this post.
Arsalan Rauf is an entrepreneur, freelancer, creative writer, and also a fountainhead of Green Hat Expert. Additionally, he is also an eminent researcher of Blogging, SEO, Internet Marketing, Social Media, premium accounts, codes, links, tips and tricks, etc.