I spend more time on performance and optimization of my website. After doing optimization, I have found an interesting performance improvement feature. In this post, I shall show you how to install and setup MaxCDN in WordPress.
I have done a number of test on Pingdom site. The fast load time of my homepage was just 483ms. I ran the test several times and in different hours. The load time of the site was 1.7 seconds and here is the screenshot:

There is a lot in the performance optimization (reducing HTTP queries like loading scripts only when they are required, optimizing images, combining scripts and stylesheets etc). one of the main feature that was making our site load faster that is, WordPress CDN. I was using MaxCDN and you can also read Why You Need a CDN for your WordPress blog or website. And you can also learn that What is a CDN in this guide.
If you want to follow this tutorial or guide, you need a MaxCDN account. It is affordable and worth the money. If you do not possess an account so sign up now.
After creating your account with MaxCDN, you need to install the WordPress plugin known as W3 Total Cache.
First of all, you need to create a pull zone in your MaxCDN dashboard.
Log in to your MaxCDN account, click on Manage Zones and then Create Pull Zone Button.
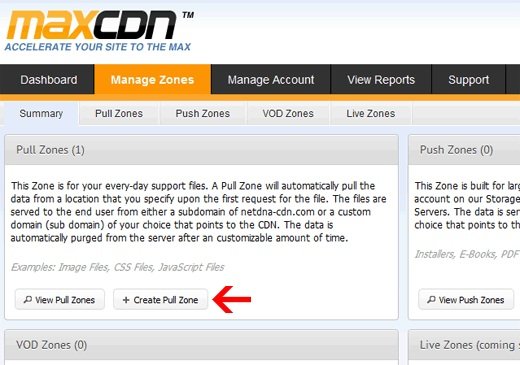
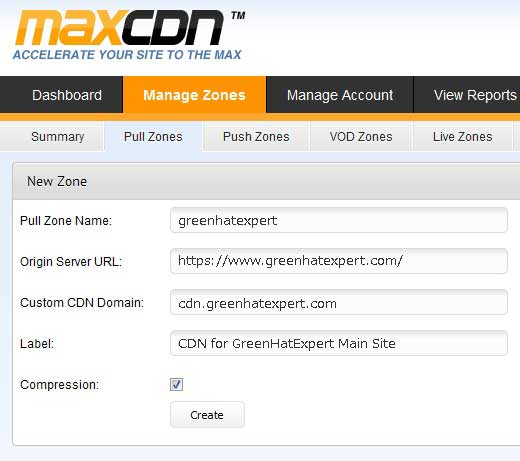
You will be asked to give details for your pull zone in the next screen.
- Pull Zone Name: Provide any name to this pull zone so that you can identify it in your MaxCDN panel.
- Origin Server URL: Now enter the URL of your WordPress website that starts with http:// that ends with a slash / at the end.
- Custom CDN Domain: enter any subdomain like cdn.greenhatexpert.com
- Label: Give description for this pull zone.
- Compression : You can save bandwidth by enabling compression so it is highly suggested that you check this box.
After creating it, you will see a success screen. In the green box, you will have a URL for your CDN.
On the next screen, you will see a URL like “wpb.greenhatexpert.netdna-cdn.com” copy and save this URL in a text file using notepad because you will need it later. If you visit your dashboard, you will see the zone that you have created successfully. Click on the ‘manage’ icon.

Next, you need to click on the “Settings” tab and look at the custom domains.
![]()
Your goal is to add multiple subdomains (CNAMEs), so we can improve the performance of pipelining in the browser. To do this click the edit button on custom domains and just add multiple custom domains.
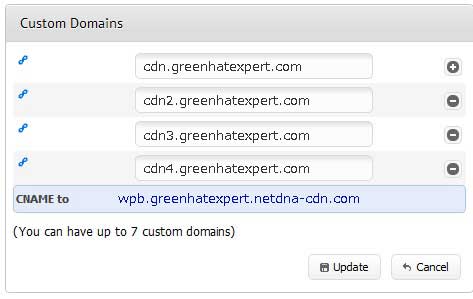
After adding the custom subdomains, simply click the update button. In the compression settings, make sure that you have enabled Gzip compression. So you have configured your pull zone, take the long CDN URL which you got in previous steps which looked like this “wpb.greenhatexpert.netdna-cdn.com. you will need it to set CNAME records. I shall show you how to create CNAME record using cPanel.
Most WordPress hosting providers use cPanel. Scroll down to the domains section and click on simple DNS Zone editor.

On this page, you will have to fill out the fields to add a CNAME record.
You need to fill the required values which are: Name and CNAME.
- Name:This is the name of your Custom CDN Domain. For example, my custom CDN domain is cdn.greenhatexpert.com, so I will put “cdn” in our name field.
- CNAME:This will be URL provided to you by MaxCDN when you created the pull zone. For example: “wpb.greenhatexpert.netdna-cdn.com”.
Example screenshot:

Repeat this process for all the custom domains that you will add. The CNAME value will remain the same. All you have to change is the name such as ‘cdn’, ‘cdn2’ etc. Adding the CNAME method can be different if you are using a non cPanel host.
Now you have configured MaxCDN, now go ahead and integrate it with WordPress. You have to use the W3 Total Cache plugin. Install and activate the plugin.
On the general screen, when you will scroll down, you will see a CDN box. Enable CDN and select NetDNA/MaxCDN option.
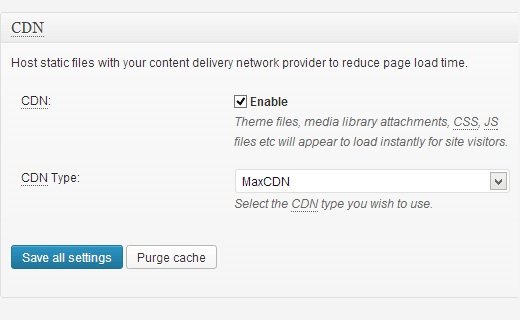
Save the settings. Now go to the CDN menu in W3 Total Cache to configure MaxCDN with WordPress. This page will ask you to enter your API ID, API key and custom domain names.
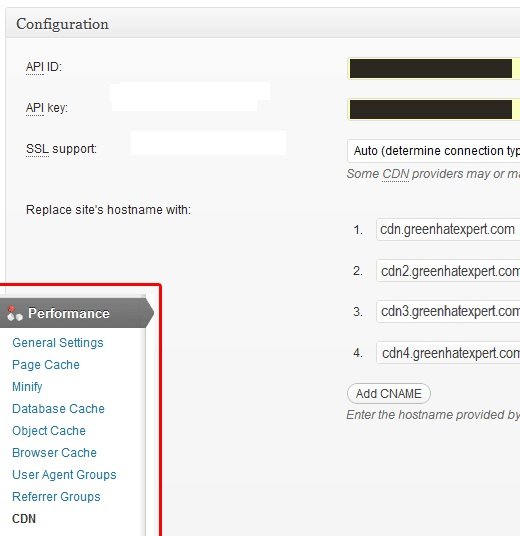
You will get your API ID and Key from your MaxCDN dashboard. Go to Manage Account>API. Click on add key to create your key.

After configuring the W3 Total Cache part, you are done. You can click on the Test NetDNA button and you will be able to pass the test.
Want to improve your WordPress site speed?
Use MaxCDN for this purpose.
Do not forget to share this post.
Arsalan Rauf is an entrepreneur, freelancer, creative writer, and also a fountainhead of Green Hat Expert. Additionally, he is also an eminent researcher of Blogging, SEO, Internet Marketing, Social Media, premium accounts, codes, links, tips and tricks, etc.
I was able to download craigslist email harvester after following your instruction of posting a comment to unlock. Please fix or send me link to download. Thank you.
Correction: I was not able to download as link was still locked.